[Unity] Null Condition Operator & Null Coalescing Operator (注意 Unity 陷阱)

首先先簡單介紹一下 Null Condition Operator

Null Condition Operator 是 C# 6.0 的新語法
可以讓你寫出更加精簡而且可讀性佳的語法
先看一下不使用 Null Condition Operator 的情況

var text = string.Empty;
if (m_controller != null)
{
    if (m_controller.m_display != null)
    {
        if (m_controller.m_display.m_text != null)
        {
            text = m_controller.m_display.m_text.text;
        }
    }
}

如果使用 Null Condition Operator 的話,可以改寫成以下的語法

var text = m_controller?.m_display?.m_text?.text;
if (text = null)
{
    text = string.Empty;
}

?. 的左側是 null 就不會執行右側的語法
如此就可以移除掉很多 null 檢查
程式就會更加簡潔好讀

如果其中任何一部份為 null
text 最後的結果就是最後結果的預設值 (default)
對於參考型別來說就是 null 了
值型別就是 0 或 false

同時我們也可以搭配 Null Coalescing Operator (??) 寫出更精簡的敘述句
我們可以將前面的句子再改寫成底下的敘述式

var text = m_controller?.m_display?.m_text.text ?? string.Empty;

除了可讀性以外
另外一個好處則是 Null Conditional Operator 在多執行緒環境下可以安全的使用

以第一個例子來說
如果我們在檢查完 m_controller 不是 null 之後馬上被另外一個 thread 設為 null
那麼在接下來的 m_controller.m_display 仍然會拋出 NullReferenceException
Null Conditional Operator 則會由 compiler 使用額外的參考來避免例外發生

總之,請盡量使用 Null Conditional Operator  跟 Null Coalescing Operator
取代傳統的巢狀 if 的 null 檢查

Ref. [MSDN] Null-conditional operators ?. and ?[]
Ref. [MSDN] ?? and ??= operators (C# reference)

Unity 使用 Null Conditional Operator 的注意事項

雖然 Null Conditional Operator 很好用
但是在 Unity 卻有一個不容易發現的陷阱
雖然影響並沒有很大
但是奇怪的錯誤訊息與行為可能會讓你十分困擾

假設有這樣的程式碼
我們有一個 m_controller 繼承自 MonoBehaviour
並且有一個函式 DisableController 用來清除掉這個 m_controller
OnDestroy 則是用來保證 m_controller 能夠正確的被清除掉

public class TextInstance : MonoBehaviour
{
    public string text = "TEXT";
}

public class Test1 : MonoBehaviour
{
    [SerializeField] private TextInstance m_instance;

    private void UnsafeLogText()
    {
        Debug.Log(m_instance?.text ?? "");
    }

    private void UnsafeDestroy()
    {
        Destroy(m_instance?.gameObject);
    }

    private void SafeLogText()
    {
        if (m_instance != null)
        {
            Debug.Log(m_instance.text ?? "");
        }
    }

    private void SafeDestroy()
    {
        if (m_instance != null)
        {
            Destroy(m_instance.gameObject);
        }
    }
}

但是這一段程式碼如果曾經呼叫過 UnsafeDestroySafeDestroy 的話
如果再次呼叫 UnsafeLogText 會印出 TEXT
如果再次呼叫 SafeLogText 則不會印出任何東西

如果再次呼叫 UnsafeDestroy
此時你會看到你的輸出視窗會印出錯誤訊息

MissingReferenceException: The object of type 'TextInstance' has been destroyed but you are still trying to access it.
Your script should either check if it is null or you should not destroy the object.

這個結果表示 Unity 在 Destroy 物件後的 m_instance != null?. 行為並不一致
並且這個不一致的結果只在 Editor 上發生,實際裝置上並不會發生

因此
如果是對於可能在執行期間刪除的 MonoBehaviour 物件
最好總是在 Destroy 之後將變數設為 null
如果外部可以拿到這個 MonoBehaviour 的參考時
你可能無法將所有的參考都設為 null
這時候最好避免用 Null Conditional Operator 做判斷

接下來要解釋一下為什麼會發生這個問題


UnityEditor 在物件消滅時並不會完全從記憶體中清除
因此在你不小心使用到已經消滅的物件時
UnityEditor 才有辦法提供足夠的資訊讓你除錯
所以 Unity 是透過覆寫 UnityEngine.Object 的 == operator
讓已經消滅的物件跟 null 比較時返回 true
不過因為 Null Conditional Operator 與 Null Conditional Operator 是 C# 語言層的語法
使用的是 ReferenceEquals 而不是 == operator
因次在 UnityEditor 中的判斷會失敗
而 ReferenceEquals 是 System.Object 的 static method 無法覆寫
Unity 為了除錯的考量也不打算修改這個歧異的行為
所以在 Unity 使用 ?. 或是 ?? 的時候需要特別注意

最後,這是建議的用法

  1. 如果不是繼承 UnityEngine.Object 的類別,盡量使用 ?. 或是 ?? 簡化程式碼
  2. 如果是繼承 UnityEngine.Object 的類別,如果可以確保呼叫的物件不會中途被 Destroy ,可以使用 ?. 或是 ?? 簡化程式碼
  3. 如果是繼承 UnityEngine.Object 的類別,並且物件的參考不會被外部取得。只要在 Destroy 時立刻將自己設為 null,還是可以使用 ?. 或是 ?? 簡化程式碼
  4. 否則,請使用 if 判定 null

[Unity] 存取修飾詞 (Access Modifier) 與 Special folders & Assembly definition files

存取修飾詞 Access Modifier

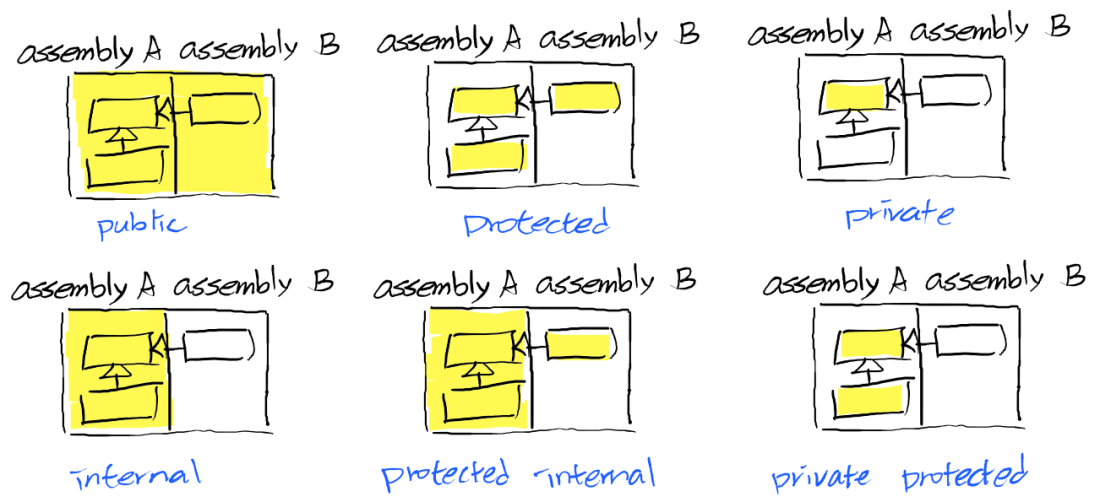
C# 的存取修飾詞有以下六種

  • public – 所有人都可以存取
  • protected – 只有所在類別以及他的的衍生類別可以存取
  • private – 只有所在類別可以存取
  • internal – 只有在相同 assembly 的類別可以存取
  • protected internal – 只有在相同 assembly 的類別或是所在類別以及他的的衍生類別可以存取 (也就是 protected OR internal)
  • private protected (C# 7.2) – 只有在相同 assembly 的類別以及所在類別以及他的的衍生類別可以存取 (也就是 protected AND internal)

從這張簡圖就很容易了解不同修飾詞的範圍
Access modifier 簡圖

Type 只能宣告為 publicinternal,Type Member 可以用所有的存取修飾詞宣告。

Default Access Modifier

預設值總是可見度最低的存取修飾詞。Type 為 internal,Type Member 為 private

預設的存取修飾詞 可用的存取修飾詞
namespace level
enum internal public, internal
interface internal public, internal
class internal public, internal
struct internal public, internal
delegate internal public, internal
type level
enum private public, protected, internal, private, protected internal, private protected
interface private public, protected, internal, private, protected internal, private protected
class private public, protected, internal, private, protected internal, private protected
struct private public, protected, internal, private, protected internal, private protected
delegate private public, protected, internal, private, protected internal, private protected
enum value public public
interface member public public
class member private public, protected, internal, private, protected internal, private protected
struct member private public, internal, private

以軟體設計的原則,應該讓類別、變數的可見性最小化。也就是說不需要公開的類別就不應該設為 public。

如果是開發共用的函式庫,我們希望讓程式碼被其他專案重複使用時,我們通常會把共用的函式庫放在獨立的資料夾與命名空間內。

另外也可以用獨立的儲存庫來存放,並且用 submodule 的方式加入到我們的專案中。

在 Unity 中,除了位於特殊資料夾以外的所有檔案會被放在遊戲專案中,為了降低程式間的耦合,以及避免在開發階段中意外將遊戲的功能寫到共用的函式庫的問題,我們可以利用一些 Unity 的機制來達成。

Special folders

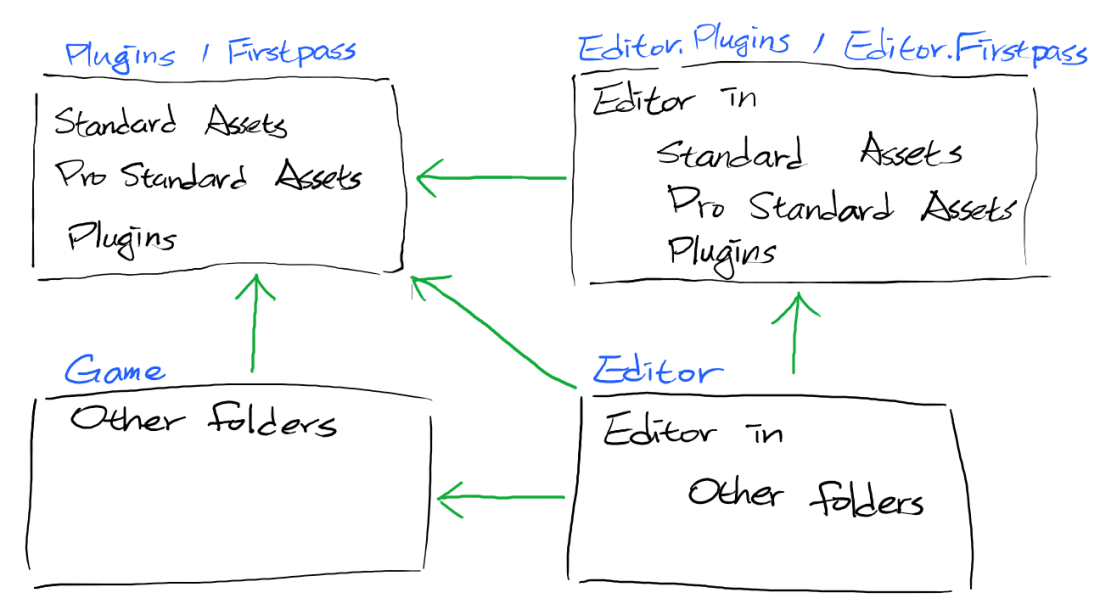
根據 Unity 的說明,依據檔案所在的資料夾不同,script 會被分配到不同的專案中。也會有不同的編譯順序。根據官方說明,最多會分成四個專案編譯:

  • Phase 1: 在 Standard Assets、Pro Standard Assets 以及 Plugins 中非 Editor 資料夾的程式碼
  • Phase 2: 在 Standard Assets、Pro Standard Assets 以及 Plugins 中 Editor 資料夾的程式碼
  • Phase 3: 在 Standard Assets、Pro Standard Assets 以及 Plugins 以外非 Editor 資料夾的程式碼
  • Phase 4: 在 Standard Assets、Pro Standard Assets 以及 Plugins 以外的 Editor 資料夾的程式碼

Ref. Special folders and script compilation order

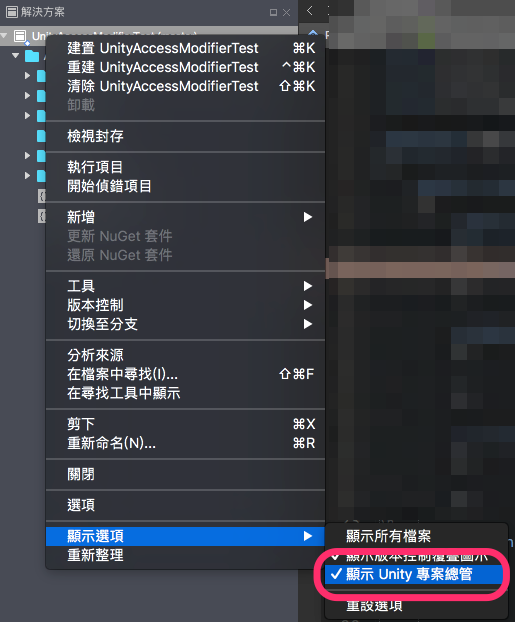
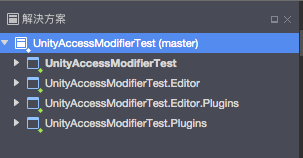
如果你使用 Visual Studio for Mac 開啟 Solution 只看到一個專案,你可以在 Solution 上按右鍵 -> 顯示選項 -> 顯示 Unity 專案總管,取消勾選後就會看到實際的專案。

UnityProjectManagerUnityProject

實際上檢查各專案的參考設定可以得到底下的相依圖。

SpecialFolders

了解了這些細節,我們有了以下的設計:

  • 遊戲專案相依於第三方專案(Ex. Asset Store 買來的插件)
    • 當第三方插件放在 Assets 內,而不是 Plugins 內,就會讓遊戲專案可以存取到第三方插件的 internal 成員,這通常會破壞了第三方插件想要對外隱藏的資訊。
    • 要達成這個目標,需要將所有的第三方插件移動到 Plugins 資料夾內。
    • 部分第三方插件並沒有這樣設計,而且移動資料夾會造成之後更新維護的困擾。
    • 這部分通常沒有大問題,畢竟我們不太會去修改第三方插件的內容。
    • 在 Unity 2017.3 之後可以用 Assembly definition files 來解決 (稍後提到)。
    • 在 Unity 2017.2 以前還是先保留在第三方插件原始的位置,使用上請注意不要誤用到 internal 的成員。
  • 對於跨專案共用的函式庫
    • 在 Unity 2017.2 以前可以將共用的函式庫放在 Plugins 之中,並且用 submodule 放到獨立的儲存庫。
      • 如果將共用的函式庫放在  Plugins 以外,如此一來共用函式庫的內容就會跟遊戲專案在同一個 Assembly 之中。如果在新增或修改程式時沒有注意到,很容易在共用函式庫中呼叫遊戲專案的程式,造成其他用到此共用函式庫的專案編譯失敗。放在 Plugins 可以讓這個情形在編譯時就發生錯誤,避免在其他專案更新時才發現錯誤。
    • 在 Unity 2017.3 之後可以用 Assembly definition files 來放到 Plugins 以外的資料夾,並且用 submodule 放到獨立的儲存庫。


Assembly definition files

從 Unity 2017.3 開始,我們可以針對不同的資料夾指定要編譯到獨立的專案中,並且設定彼此之間的相依關係。如此一來,就可以把第三方插件放在各自的 Assembly 之中,避免彼此影響,也不需要改變現有資料夾架構,只需要加入一個定義檔即可。

使用時只要在資料夾上按右鍵,選擇  Assets Create > Assembly Definition 就會新增一個定義檔。然後在 Inspector 上將名稱與相依的 Assembly 設定好,在這個資料夾內的 Script 就會被分配到你指定名稱的專案中。你可以開啟 Visual Studio for Mac 確認。

Editor 似乎不會自動建立到 Xxx.Editor 專案中,所以需要同時加上 Editor 的 Assembly Definition File。

Ref. Script compilation and assembly definition files

另外使用 Assembly Definition File 額外帶來的好處還有。各別專案變小之後,當專案內的檔案有變動時,不需要重新編譯整個 Assembly-CSharp 。所以也可以提升編譯的速度。

[Unity] 忽略警告訊息

在 Unity 中如果有用到其他 Plugins 經常會發現許多來自這些 Plugins 的 Warning
如果不處理的話,這些訊息可能會淹沒了專案中需要注意的警告訊息

底下是來自目前專案的警告訊息

Unity 看到的警告訊息大約 300個
Unity warning

從 Visual Studio for Mac 看到的警告訊息超過 2000個
Visual Studio for Mac warning

NOTE: Unity 跟 Visual Studio for Mac 的警告訊息數量不同,最好兩個都檢查

雖然理論上警告訊息必須要修正,But 專案進行中總是有很多無法掌握的情形,
以下介紹目前處理專案中難以修改的警告訊息的方式

Plugins’ warning

但是對於第三方的 Plugins 我們可以先用 #pragma warning 關閉
關閉的方式使用 disable 關閉並在使用後用 restore 開啟顯示警告

底下的例子來自 MSDN

// CS0649.cs
// compile with: /W:4
using System.Collections;

class MyClass
{
#pragma warning disable 0649
   Hashtable table;  // CS0649
#pragma warning restore 0649
   // You may have intended to initialize the variable to null
   // Hashtable table = null;

   // Or you may have meant to create an object here
   // Hashtable table = new Hashtable();

   public void Func(object o, string p)
   {
      // Or here
      // table = new Hashtable();
      table[p] = o;
   }

   public static void Main()
   {
   }
}

Ref. MSDN: #pragma warning (C# Reference)
Ref. MSDN: Compiler Warning (level 4) CS0649

可以在發生警告前一行加上 #pragma warning disable warning-list,並且在發生警告後一行加上 #pragma warning restore warning-list 開啟。
一個檔案的警告太多也可以在檔案開頭與結尾分別加上關閉與還原。

NOTE: 這樣的關閉方式,一但更新 Plugins 的時候必須要重新處理一次

Project’s warning

相較於 Plugins 的警告訊息,自己專案的警告訊息是比較需要處理的。
不過 Unity 本身的機制會造成許多警告訊息不斷出現,會影響到重要的警告被淹沒在大量警告訊息中
底下的範例示範在 Unity 中引發最常見的警告 CS0649 的方式:

using UnityEngine

public class ExampleScript : MonoBehaviour
{
    private int noWarning;

    // Warning CS0649: Field is never assigned to, and will always have its default value null
    [SerializeField] private int warning0649;

    private void Awake()
    {
        noWarning = warning0649;
    }
}

以上的情況很常發生,通常發生在我們要在 inspector 上設定值或是參考到場景上的 GameObject 的變數上且沒有給初始值的情況。
解決方法可以在宣告上加上初始值,雖然大部分這個初始值不會發生作用

[SerializeField] private int warning0649 = 0;

對於開發中的專案,要修復可能必須花上很多時間
所以我們可以採用另一種比較暴力的處理方式
使用 mcs.rsp Ref. Unity Documentation: Global custom #defines

詳細的使用參考可以用 mcs -help 指令查詢

我們用到的是其中的 nowarn 參數來將特定的警告關閉
以下是我們的 mcs.rsp 的內容,檔案需要放在 Assets/mcs.rsp

-nowarn:0649
-nowarn:1635

在這裡我們關閉了 CS0649 這個常見的警告訊息,另外也關閉了 CS1635 這個新的警告訊息!
這個警告訊息是說,我們在全域關閉了某個警告訊息,如果有人用 #pragma warning restore 重新開啟警告時就會有這個警告
因此我們也需要忽略這個警告
Ref. MSDN: Compiler Warning (level 1) CS1635

Conclusion

不論是用 #pragma warning 或是 mcs.rsp 來忽略警告訊息都不是很推薦的作法
最好還是將警告都處理掉,
不過對於外部的 Plugins 可以稍微放寬一點,容忍警告的發生,但是避免警告影響到專案本身
將 Plugins 的警告都隱藏起來,只要關注在專案本身
對於現有專案,考量到修改的成本,使用全域的 mcs.rsp 只是折衷的手段,
最終還是需要花費時間回頭處理累積的技術債